# SWin-Transformer解读
# 1.基础介绍
Swin-Transformer是2021年03月微软亚洲研究院提交的论文中提出的,比ViT晚了半年左右,相对于ViT而言,Swin-Transformer的改进,使transformer能作为新的视觉任务backbone,用于分类分割和检测,姿态估计等任务。
论文:https://arxiv.org/abs/2103.14030 (opens new window)
代码:https://github.com/microsoft/Swin-Transformer (opens new window)
Swin-Transformer是Shifted Window Transformer,作者指出了将transformer应用到视觉任务中需要解决的两个问题,
一个是在ViT中就已经提到的计算self attension时L(在视觉任务中是image size)的平方,着限制了transformer处理大分辨率图像的能力。
另一个,对于像语义分割/目标检测这些任务,最好能输出层级的金字塔型的特征,以增加模型处理不同scale对象的能力,同时也更利于使用过去研究中已验证有效果的trick。
Swin-Transformer中作者针对上述两个问题提出的方法分别是Shifted Window based Self-Attention和随着网络的深度合并图像patch来生成层级特征图。

# 关于Shifted Window based Self-Attention
先来看transformer中的常规全局Multi-Head Self Attention(MSA)的计算复杂度,
Q=K=V,shape为(L, C) L对应的是序列的长度对于C是模型的通道数等同于hidden_dims,shape都为(C,C),MSA输出的通道数也是C,则shape为(C,C)。那么,对于全局注意力机制的计算包括A是SV的结果,它们对应的计算复杂度分别为MSA的计算复杂度为

相对于全局MSA,另一种方式是基于不相交窗口(window)的W-MSA。将一张大小为patch,然后在patch上应用自注意力机制。W-MSA方式对每个小图像patch的计算复杂度为patch,因此对于W-MSA时的计算复杂度为:
从上面的比较可以看到,选定patch_size的大小,W-MSA的计算复杂度变成了和输入图像大小成线性的关系。
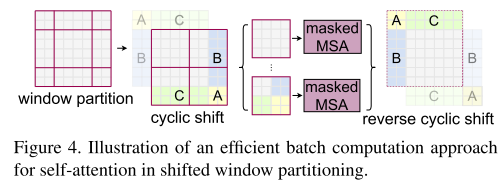
但是,通过上面对W-MSA实现方式的介绍不难发现,原本作用在整张图像上的全局注意力现在仅作用在patch上,图像patch上又没有连接,直观上就让人觉得,这会导致模型缺少提取全局特征的能力,对于此,作者提出的办法是Shifted Window MSA,简称SW-MSA。具体办法就是对于shape为(B, H, W, C)的输入在H,W的维度上,将图像往左上角轮动WMSA。
这里轮动的含义通过几个例子来表述,
对于一维数组, 如[1,2,3,4,5]往左轮动2位变成[3,4,5,1,2]。
而对于二维数组:如
[[1,2,6,4,5],
 [0,1,3,4,5],
 [9,2,4,4,5],
 [1,8,2,4,5],
 [1,2,1,4,5]]
往左上轮动2位变成,
[[4, 4, 5, 9, 2],
 [2, 4, 5, 1, 8],
 [1, 4, 5, 1, 2],
 [6, 4, 5, 1, 2],
 [3, 4, 5, 0, 1]]
上面介绍的轮动可以借助torch.roll函数来实现。
对于处理数据的shifted window操作可以参考论文中图示,

值得注意的是轮动后除了对window之间建立了连接,还会导致轮动后落在同个window中的图像边沿
建立连接,这是不希望发生的情况,因为图像变沿之间本来就没有连接关系,为解决这个问题作者使用的mask方法。
def window_partition(x, window_size):
    """
    Args:
        x: (B, H, W, C)
        window_size (int): window size

    Returns:
        windows: (num_windows*B, window_size, window_size, C)
    """
    B, H, W, C = x.shape
    x = x.view(B, H // window_size, window_size, W // window_size, window_size, C)
    windows = x.permute(0, 1, 3, 2, 4, 5).contiguous().view(-1, window_size, window_size, C)
    return windows


class AttenMask:
    def __init__(self,):
        self.window_size = 2
        self.shift_size = 1

    def get_mask(self):
        x = torch.zeros((1, 4, 4, 1))

        h_slices = (slice(0, -self.window_size),
                    slice(-self.window_size, -self.shift_size),
                    slice(-self.shift_size, None))
        w_slices = (slice(0, -self.window_size),
                    slice(-self.window_size, -self.shift_size),
                    slice(-self.shift_size, None))
        cnt = 0
        for h in h_slices:
            for w in w_slices:
                x[:, h, w, :] = cnt
                cnt += 1
        print(x)
        mask_windows = window_partition(x, self.window_size)  # nW, window_size, window_size, 1
        print(f"par: {mask_windows}")
        mask_windows = mask_windows.view(-1, self.window_size * self.window_size)
        print(f"res: {mask_windows}")
        attn_mask = mask_windows.unsqueeze(1) - mask_windows.unsqueeze(2)
        attn_mask = attn_mask.masked_fill(attn_mask != 0, float(-100.0)).masked_fill(attn_mask == 0, float(0.0))
        print(f"mask: {attn_mask}")
        return x

atten_mask = AttenMask()
x = atten_mask.get_mask()
# 相对位置偏置
在计算自注意力时,作者还是使用了相对位置偏置
对于大小为patch,其每个轴上每个元素间的相对位置取值为X轴上位置有5个[0, 1, 2, 3, 4],每个位置之间的相对位置矩阵为:
[[0, -1, -2, -3, -4],
 [1,  0, -1, -2, -3],
 [2,  1,  0, -1, -2],
 [3,  2,  1,  0, -1],
 [4,  3,  2,  1,  0]]
y方向同理。所以为了表示patch中每个元素之间的相对位置只需要patch,序列的长度为
class PosEmebd:
    def __init__(self):
        self.window_size = (7, 7)
        # define a parameter table of relative position bias
        self.relative_position_bias_table = torch.nn.Parameter(
            torch.zeros((2 * self.window_size[0] - 1) * (2 * self.window_size[1] - 1), 1))  # 2*Wh-1 * 2*Ww-1, nH

        # get pair-wise relative position index for each token inside the window
        coords_h = torch.arange(self.window_size[0])
        coords_w = torch.arange(self.window_size[1])
        coords = torch.stack(torch.meshgrid([coords_h, coords_w]))  # 2, Wh, Ww

        coords_flatten = torch.flatten(coords, 1)  # 2, Wh*Ww
        # 相减求得的是window_size中每个像素坐标点x坐标之间两两的差值,y坐标之间两两的差值 2*49*49
        # 表示的是相对位置,而不是M*M长度序列的绝对位置,因此编码矩阵就应该是(2M - 1) * (2M - 1)而非(M*M) * (M*M)
        # 至于索引是为了取出对应的相对位置编码值
        # 相减求得的是window_size中每个像素坐标点x坐标之间两两的差值,y坐标之间两两的差值 2*49*49
        relative_coords = coords_flatten[:, :, None] - coords_flatten[:, None, :]  # 2, Wh*Ww, Wh*Ww

        relative_coords = relative_coords.permute(1, 2, 0).contiguous()  # Wh*Ww, Wh*Ww, 2 x,y轴差值组合为(x,y)
        relative_coords[:, :, 0] += self.window_size[0] - 1  # shift to start from 0
        relative_coords[:, :, 1] += self.window_size[1] - 1  # 变成从0开始, 位置差值的取值范围就是 2 * window_size - 1
        relative_coords[:, :, 0] *= 2 * self.window_size[1] - 1
        self.relative_position_index = relative_coords.sum(-1)  # Wh*Ww, Wh*Ww

        print(self.relative_position_index.shape)
        print(self.relative_position_bias_table.shape)
        relative_position_bias = self.relative_position_bias_table[self.relative_position_index.view(-1)].view(
            self.window_size[0] * self.window_size[1], self.window_size[0] * self.window_size[1], -1)  # Wh*Ww,Wh*Ww,nH
        print(relative_position_bias.shape)

pe = PosEmebd()

# torch.Size([49, 49])
# torch.Size([169, 1])
# torch.Size([49, 49, 1])
到这里SwinTransformer中最核心的东西基本上就介绍完了。现在来看下网络的整体结构。
# 网络整体结构和层级特征

网络分成了4个stage,随着网络的深度加深,模型的通道数也逐渐变大,序列长度即图像大小逐渐变小,分别有stride=4,8,16,32。在每个stage之间是通过PatchMerging进行下采样来降低序列的长度,即特征图的大小的。
class PatchMerging:

  def forward(self, x)
    x = x.view(B, H, W, C)

    x0 = x[:, 0::2, 0::2, :]  # B H/2 W/2 C
    x1 = x[:, 1::2, 0::2, :]  # B H/2 W/2 C
    x2 = x[:, 0::2, 1::2, :]  # B H/2 W/2 C
    x3 = x[:, 1::2, 1::2, :]  # B H/2 W/2 C
    x = torch.cat([x0, x1, x2, x3], -1)  # B H/2 W/2 4*C
    x = x.view(B, -1, 4 * C)  # B H/2*W/2 4*C
    return x
处理图像输入部分使用的Image Embedding方法与ViT基本类似。
x = self.proj(x).flatten(2).transpose(1,2) # project convolution stride大小为patch_size